Backend Settings
Backend Settings
Register an account
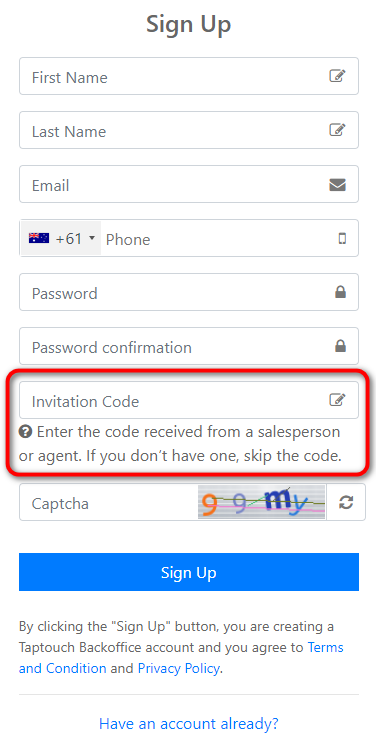
Open the Chrome browser on your PC or Mac, click https://backoffice.taptouch.net/auth/register to register a Taptouch account.
Fill in the information required. If you have received an invitation code from a salesperson or agent, fill it out and submit it to complete the registration. If you do not have an invitation code, you will be authenticated and approved within 24 hours after submission to complete the registration.
After the account registration is successful, you can visit https://backoffice.taptouch.net/ to log in to the Taptouch backend and create your store.
Create your brand and store
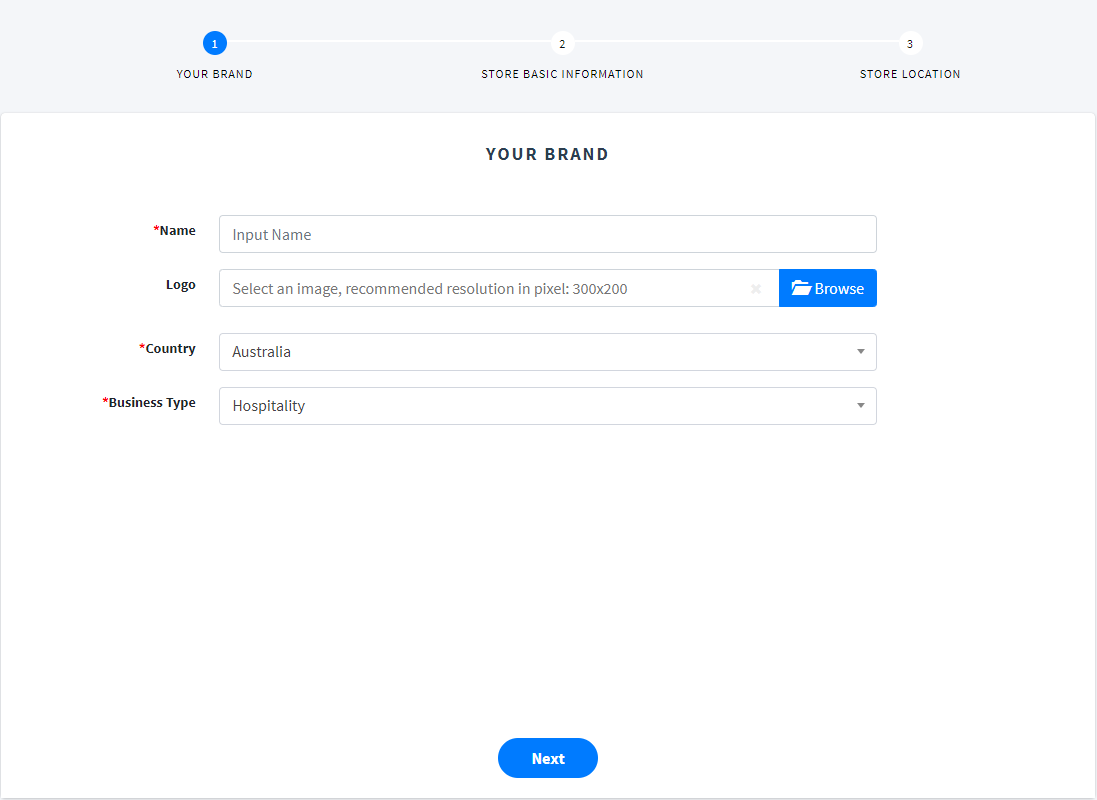
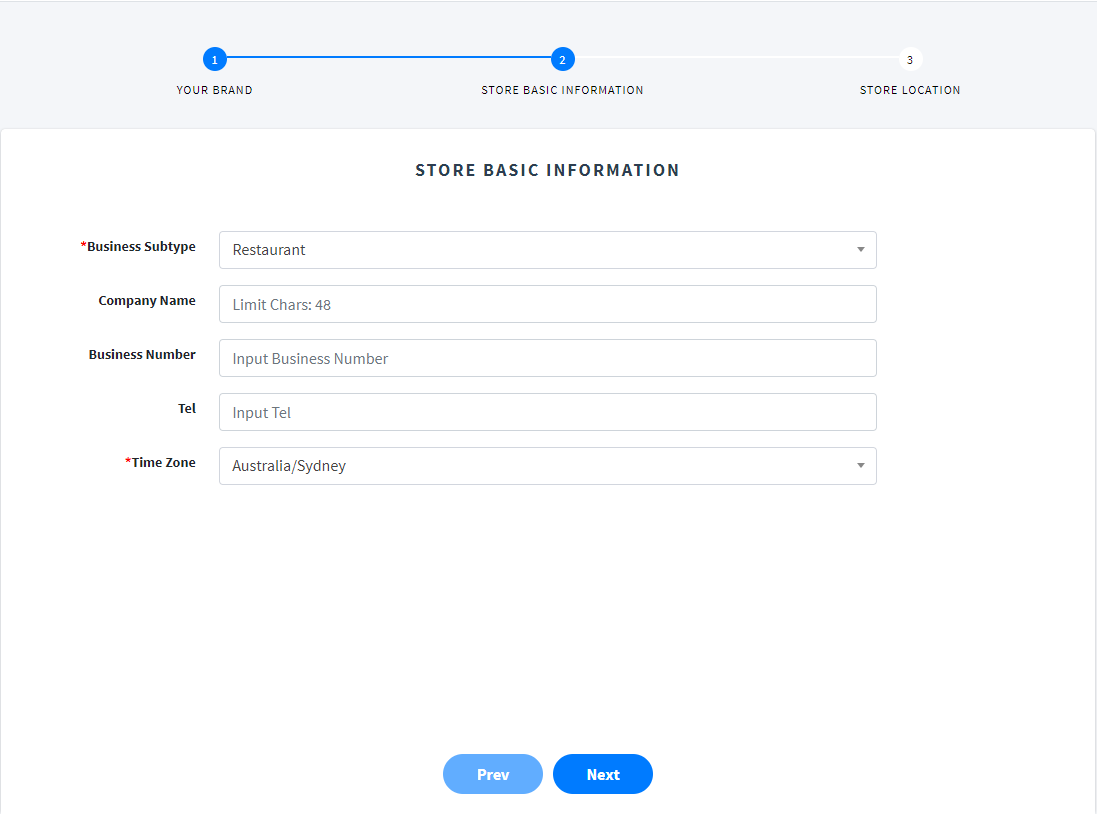
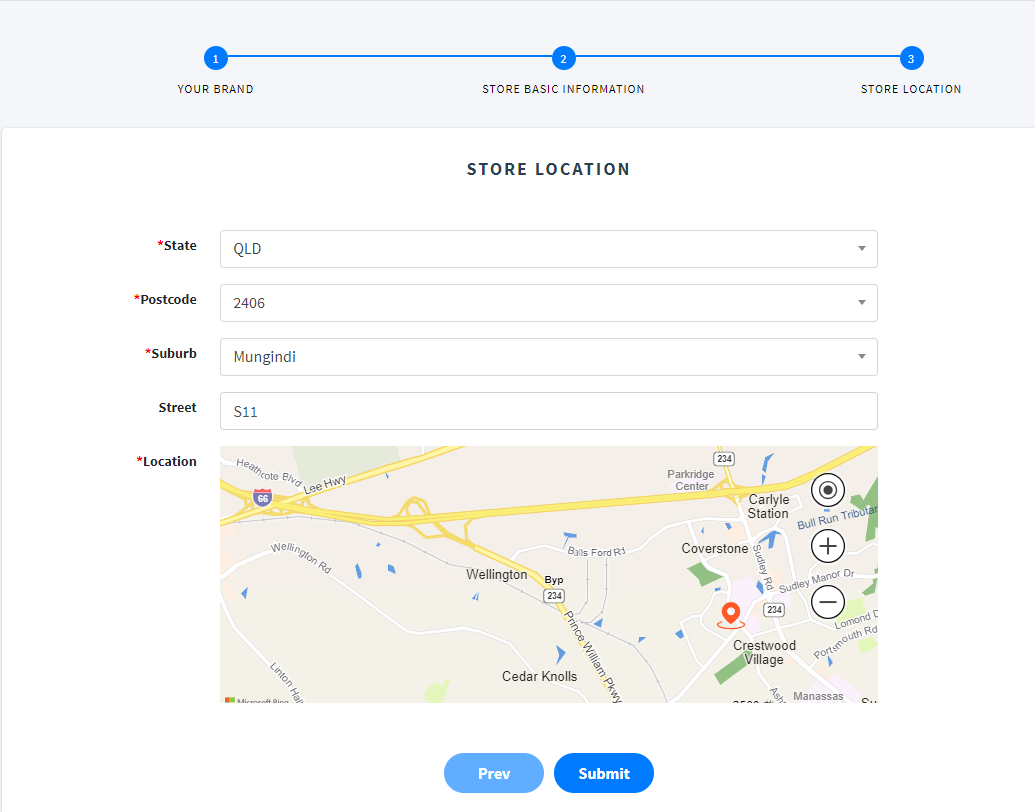
Log in to the Taptouch backend to complete the basic information of the brand and store, including: brand and store name, business type, country and time zone, store address (please allow the browser to access your location), etc.
Tips
If you have multiple stores, we recommend that you subscribe to the Multi Store function. After activation, you can manage all stores under one brand.
Product management
In order to manage the products in your store more conveniently and efficiently, you need to create categories, products, and modifiers first.
Category : Product categories, used to organize and manage products by category. For example: a coffee shop, the product categories may include "hot drinks", "cold drinks" and "snacks".
Product : The specific product sold in the store. For example, a specific product under the "hot drinks" category may be a "latte".
Modifier : Additional options for the product to meet the flexible selection needs of customers' orders. For example, for the product "Latte", additional options may include: "Milk type" (such as whole milk, skim milk, almond milk, soy milk), "Flavor" (such as vanilla, caramel, hazelnut), etc. One Modifier can be used for multiple products. For example, "Milk type" can be used for products such as "Latte" and "Australian White Coffee".
Create categories
Navigate from the left sidebar to the Items > Items > Categories page.
Click the New button in the upper right corner.

Enter the name of the category and select the color and shape of the icon.
Click Save.
After creating all categories, long press the move icon on the right side of the list to drag and drop to adjust the display order of each category on the menu.
Create products
You can manually create products one by one in the backend according to the menu used by the store, and complete the information of each product (name, price, category, etc.).
If there are too many products, we recommend that you download the product template file, fill in the product information in the required format according to the file, and import the template file to quickly create products in batches.
Manually create products
Navigate from the left sidebar to the Items > Items > Products page.
Click the New button in the upper right corner.

Set the basic information of the product, including name, price, category, etc.
If the product has different sizes, colors or other specifications, you can add multiple Variants to the product, each with its own price and inventory. For example, the "Latte" product has three Variants: small cup, medium cup and large cup. In the Variants area, you can refer to the following configuration:

If the product has additional options, you can first create a Modifier, and then add the Modifier to the product. For example: "Latte" this product, additional options may include: "milk type" (such as whole milk, skim milk, almond milk, soy milk), "flavor" (such as vanilla, caramel, hazelnut), etc.
Scroll down the page to add tags, select appropriate icons, or upload product images to facilitate customers' ordering.
Click Save.
After creating all products, click on the corresponding category in the list title bar, and long press the move icon on the right side of the list to adjust the display order of each product under the menu category by dragging and dropping.
Use template to batch create products
Navigate from the left sidebar to the Items > Items > Products page.
Tap the + New button in the upper-right corner and click Import.

Click Download Template to download the product template file.
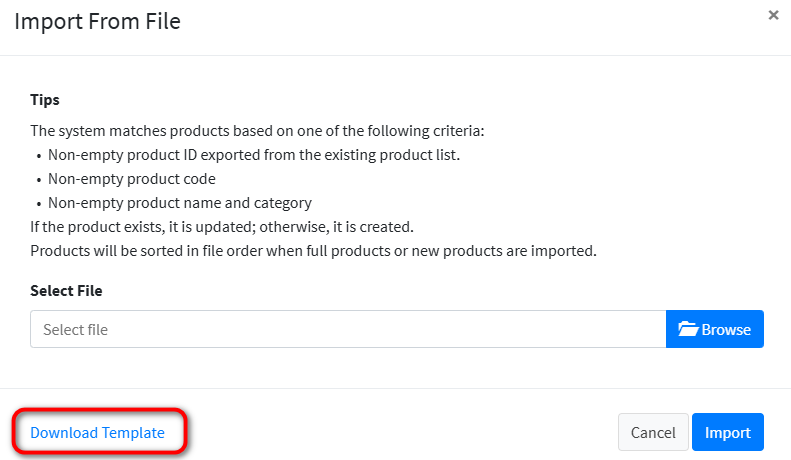
Refer to the examples provided in the template file and the instructions in the title bar to complete your product file information, and then import it into the system according to step 2 to create products in bulk.
Tips
Product template file "Name", "Price", "Category" are required, different products "Code", "Sku" can not be repeated.
Create Modifiers
Navigate from the left sidebar to the Items > Items > Addon page.
Click the + New button in the upper right corner.

Details of configuring Modifier:
Fill in the name.
Set order restrictions. Customers are required to select at least or up to several Modifier options when placing an order.
Max Limitation : The maximum number of options that the customer can choose. The default is 0, and any number can be selected.
Min Required : The minimum number of options that the customer needs to select. The default is 0, and customers can select none.
In the Options area, click New to add multiple Modifier options. Fill in the name, price, maximum number of options, and set the supported ordering methods.
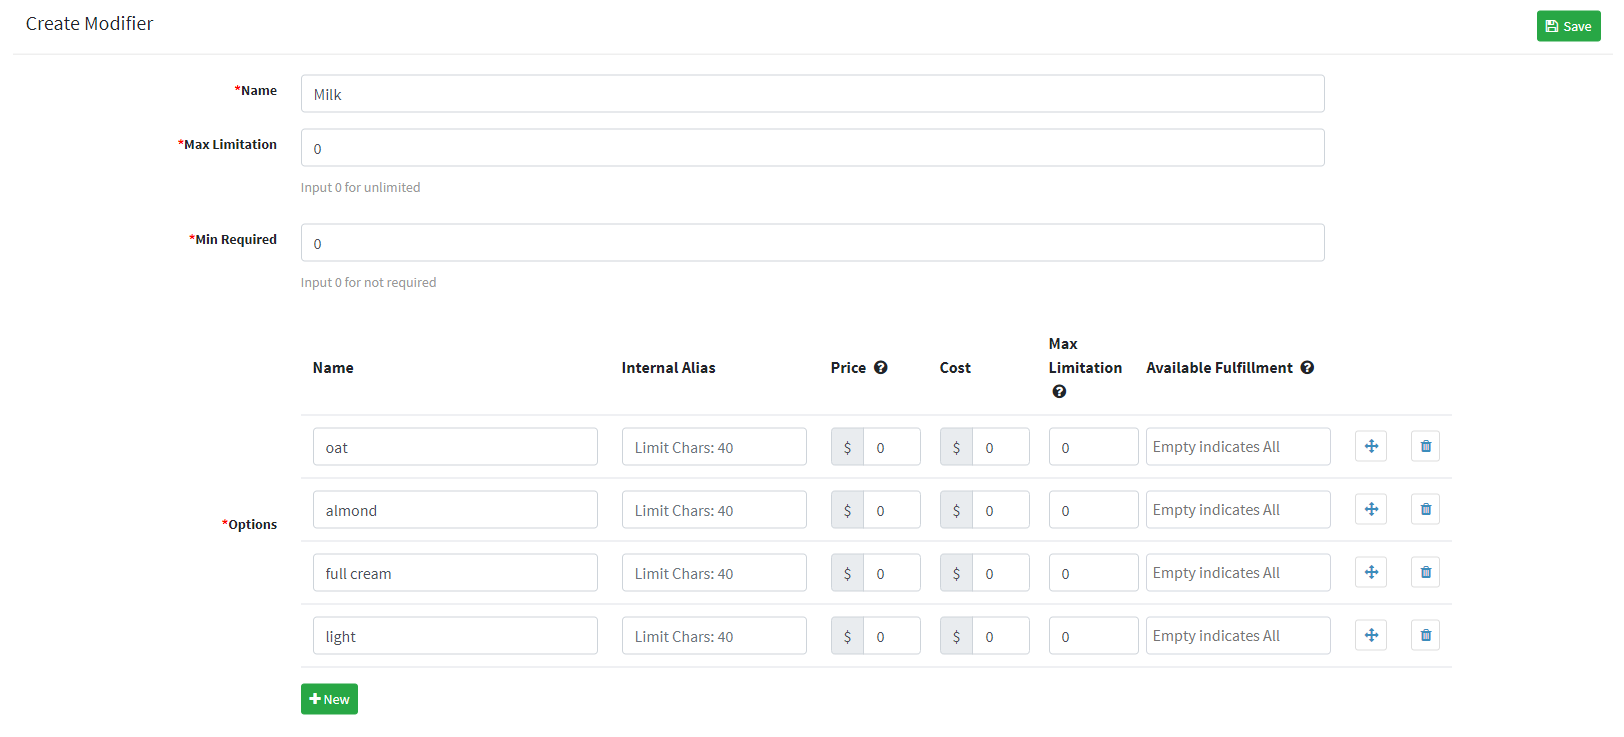
Click Save.
Add Modifiers to Products
Navigate from the left sidebar to the Items > Items > Products page.
Find the product that needs to add Modifiers in the product list, and click the pencil icon on the right.

Choose Modifiers, each product can choose multiple Modifiers.

Click Save.
Opening hours
You can set the opening hours of your store from Monday to Sunday, such as adjusting the start and end time of business, or adding multiple opening hours in a day to facilitate customers' ordering.
Navigate from the left sidebar to the Setting > Store Setting > Time Setting page.
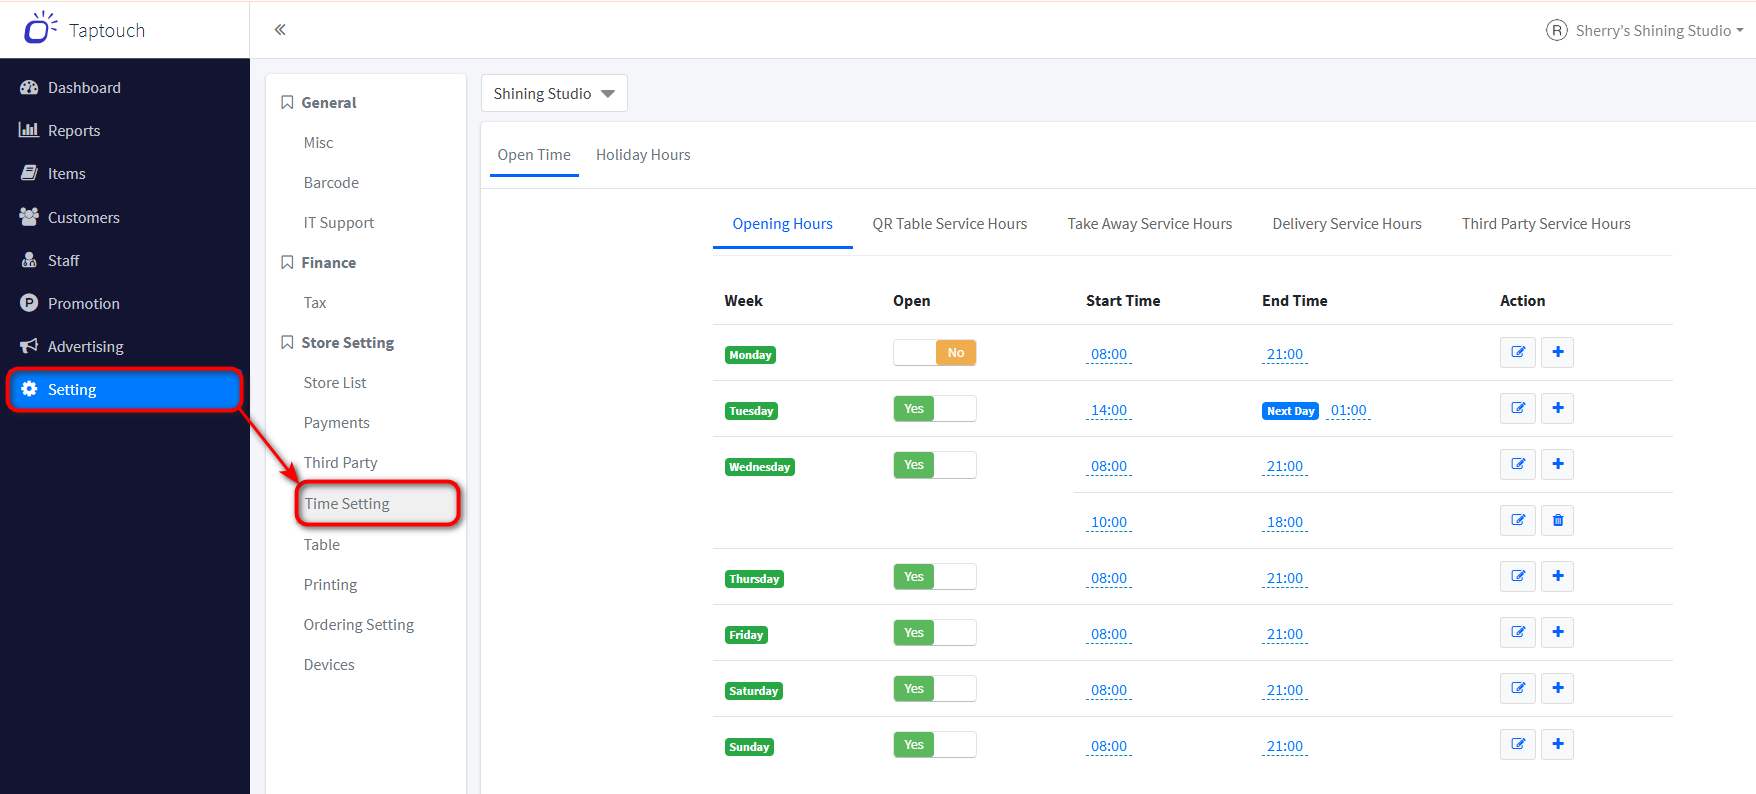
Set the opening hours for Dine In in the list from Monday to Sunday.
Adjust the opening and closing time of the store: Click the corresponding time point of Start Time & End Time, or click the pencil icon on the right to change the business hours.
Set multiple business hours for a single day: Click the "+" icon on the right to add business hours.
Tips
Try not to overlap between multiple opening hours to avoid affecting customer orders.
If the store is closed, turn off the Open switch.
Other ordering methods correspond to store opening hours that are consistent with Dine In by default. You can adjust them separately according to business needs, taking delivery as an example:
Click on Delivery Service Hours.
Turn off the Same as Opening Hours switch, and you can adjust the business hours corresponding to the order method separately.

Order Method
Taptouch POS system provides four ordering methods to choose from: Dine In、Table Service、Take Away、Delivery.
You can set the customer ordering methods supported by the store in various ordering scenarios (such as online store ordering, ordering on the in-store POS, etc.).
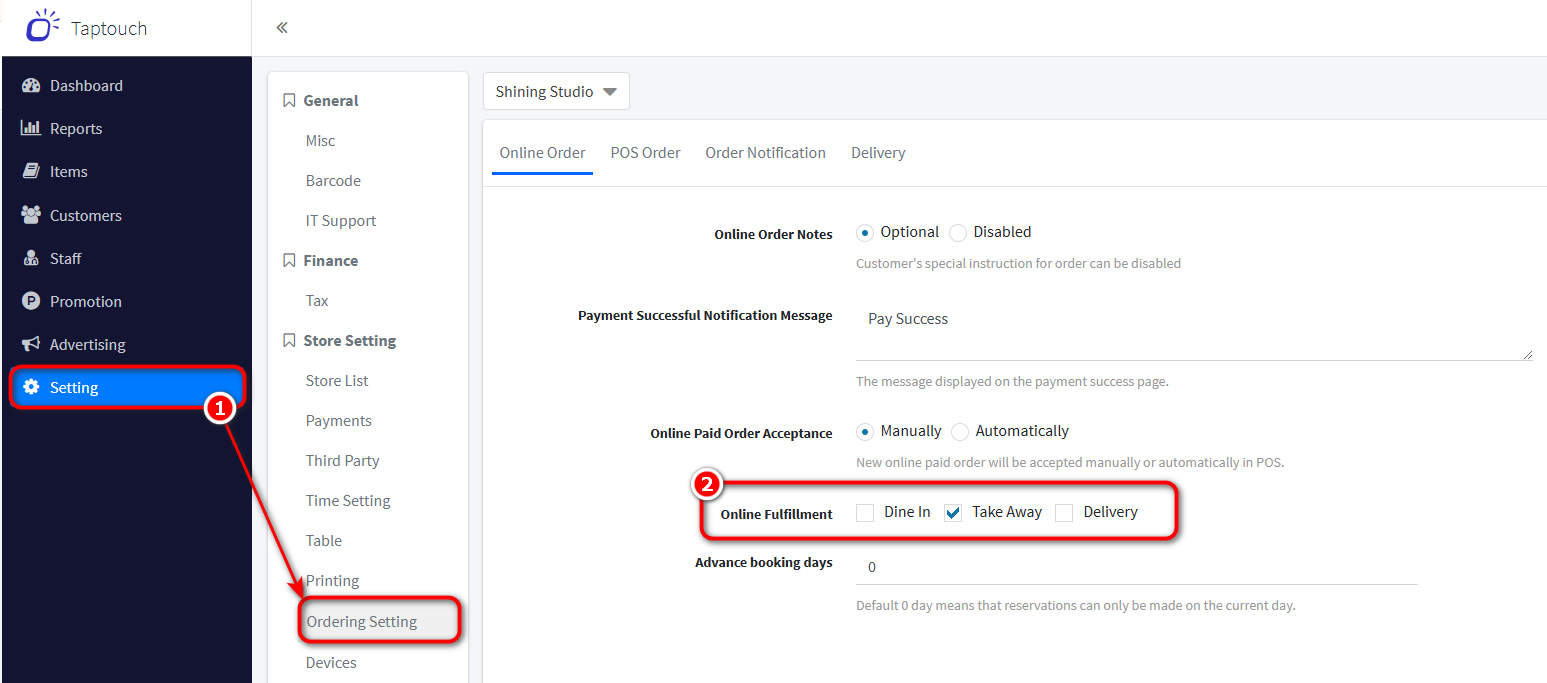
Navigate from the left sidebar to the Setting > Store Setting > Order Setting page.
Set the customer ordering method supported by the online store: In the corresponding option box of the Online Fulfillment column, check the supported ordering method, and then click Save.
Set up customer ordering methods supported by in-store POS.
Click on POS Order.
In the corresponding option box of the POS Fulfillment bar, check the supported ordering methods, and then click Save.

Payment method
Taptouch supports multiple payment methods: cash, card, integrated payment.
Integrated payment
The integrated payment ordering system is interconnected with the card reader. After the order is completed, the card reader will automatically display the amount and enter the payment process. Only when the payment is approved, the POS prints the receipt and kitchen instructions.
Fast: No need to enter the cashier amount again, reducing customer waiting time.
Accurate: Prevent missed or wrong swipes, reduce payment losses.
Save: The handling fee can be automatically paid by the customer, reducing the store's operating costs.
Tips
Taptouch POS system supports integrated payment of multiple channels such as Taptouch Pay , Tyro , ANZ, etc. By applying for the above payment methods through Taptouch, you can get the following functions for free: integrated payment , automatic calculation of surcharges during holidays , intelligent sorting and tipping. For more details, please consult our sales team to enjoy more functions and smooth user experience.
Cash and card payments
When customers check out at the POS, they default to using cash or manual swiping card (credit or debit card) to pay for orders.
You can set the credit card transaction surcharge rate that the store charges customers when they pay for orders with a credit card.
Navigate from the left sidebar to the Setting > Store Setting > Payments page.
Find the Credit Card payment method in the list and click the pencil icon on the right.

Turn on the Surcharge To Customer switch and set the surcharge rate.

Click Save.
Table management
Taptouch POS system provides merchants with free table service without monthly rent. You can create multiple tables in the backend and bind QR codes for customers to scan and order.
Navigate from the left sidebar to the Setting > Store Setting > Table page.
Click on New.
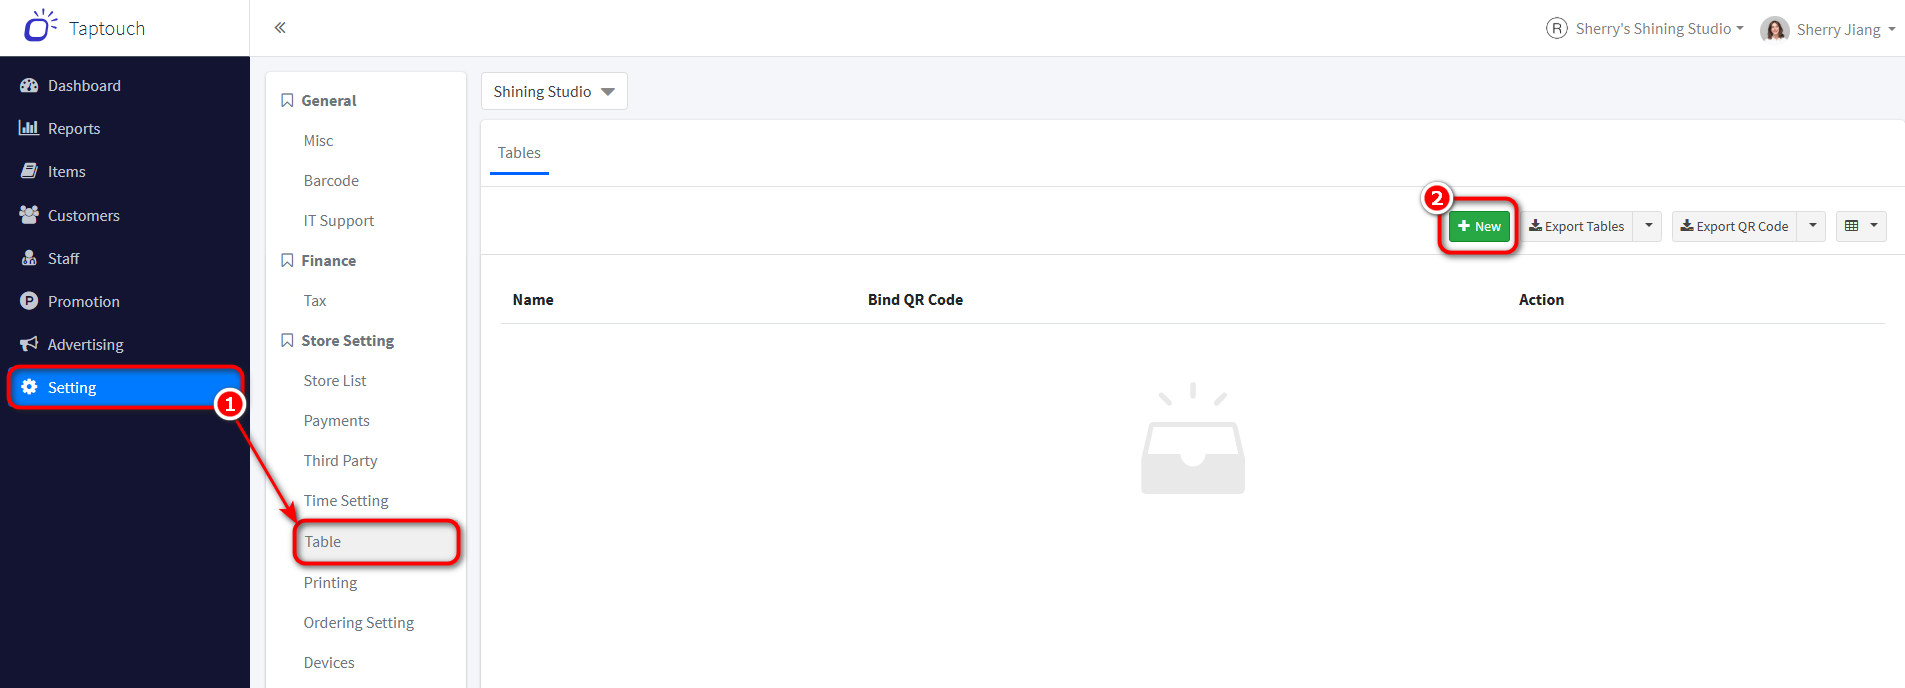
Configure the table name prefix and enter the number of tables to create, then click Save.

You can first use the QR code generation tool to generate multiple QR codes. Then click on the links of each table in the Bind QR Code column, copy and paste the newly generated QR code to bind the table, and click Save.

Print and post the QR code of the dining table on each table, and customers can scan the code to order.
Tips
Taptouch POS system has launched a more powerful Floor Plan management function, which supports creating table maps according to the actual table layout of the store, adding or adjusting tables in the table map, configuring menus and connected printers for table use, and real-time viewing of the status of each table on the POS device.
If you need it, please contact the sales manager to subscribe for you.
Online store settings
We have already set up the customer ordering method supported by the online store, as well as the corresponding opening hours.
Next, you can customize the display of the online store to improve the store's recognition, such as: logo, the back cover of the store's homepage, the theme color, etc. Or set a more memorable online store link URL to facilitate customers to visit the online store and place orders.
Navigate from the left sidebar to the Setting > Store Setting > Store List page.
Click the pencil icon on the right side of the list.

Upload the logo image of the online store in the Logo bar, and the recommended size is 300 * 200.

Click on Online Store above to edit the basic information.
Online Store : Enter the prefix of the online store URL, at least 5 characters, and can only contain numbers, letters, and underscores.
Cover Photo : Upload the homepage back cover picture of the online store, the recommended size is 1280 * 720.
Theme Color : Click the color picker to set the theme color.
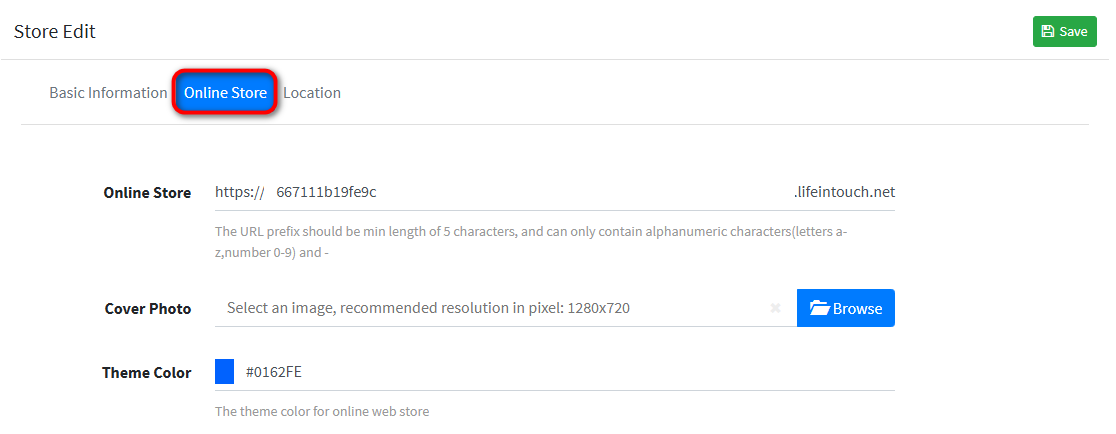
Click Save.
Kitchen printing settings
Printing kitchen slips is very important for kitchen preparation. Taptouch POS system provides a flexible and efficient printing experience. You can create multiple printer groups in the backend, each of which contains different products or categories. When configuring printers on the POS, you can decide which product to print by group.
Navigate from the left sidebar to the Setting > Store Setting > Printing page.
Click on New.
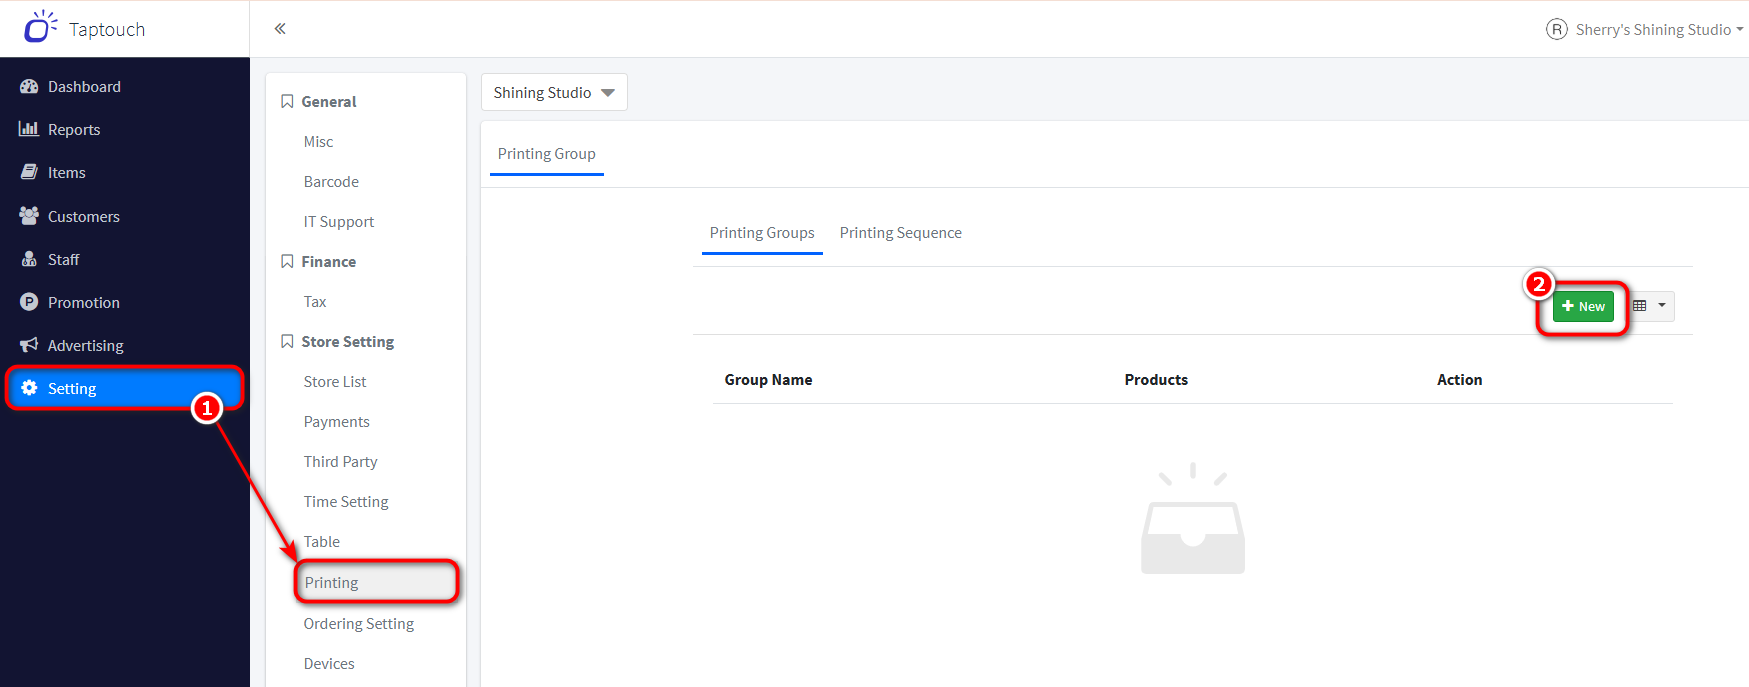
Fill in the name of the printer group and check the categories or products included in the printer group.
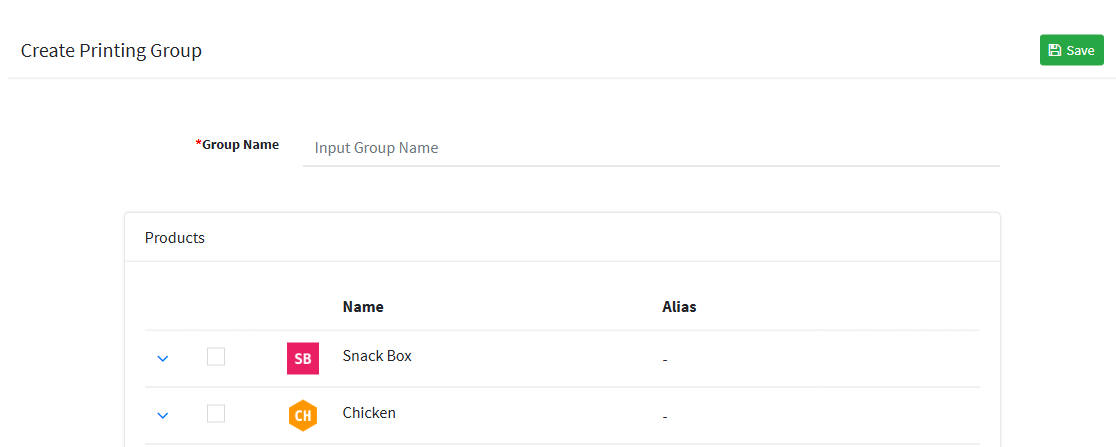
Click Save.
Based on the business needs of the store, create multiple printer groups.
Staff management
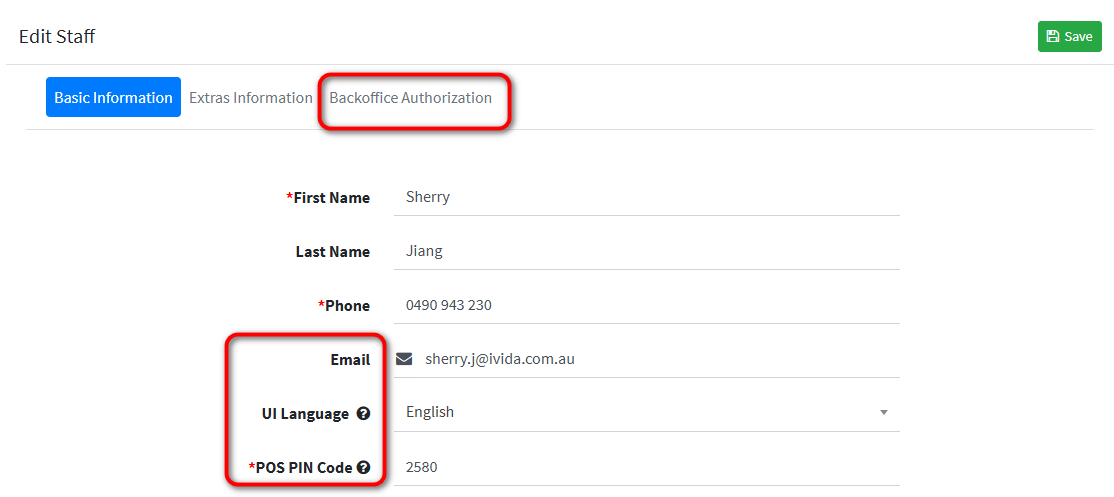
Set the information used for identity authentication when logging in to the backend and POS, including: email, password, and PIN Code. In addition, you can also set the display language after logging into the POS, supporting English, Chinese, and Vietnamese.
Navigate from the left sidebar to the Staff > Staff > Staff List page.

Click the pencil icon on the right of the list to edit the staff information:
Email : Set the email address for staff to log in to the backend or POS.
Click Backoffice Authorization and set the password for staff to log in to the backend or POS.
POS PIN Code : Enter a 4-digit PIN Code. If there are multiple staff members in the store, each staff's PIN Code cannot be the same. When staff log in to the POS, they need to enter the correct PIN Code.
UI Language : Set the display language of the system interface after staff log in to the POS.
Click Save.
Tips
If your store has multiple staff members, we recommend that you subscribe to the Multi Staff feature. After activation, you can create multiple staff members and set their login authentication information, display language of the POS interface, etc.
